Showing posts with label writing. Show all posts

Saturday, March 22, 2014

Ringing in Spring

Back in early fall when I began this blog, I envisioned great things. The hope was to update each week or at least each month about the progress in my classroom. I started off on a good foot, but then winter happened...DUN, DUN, DUNNNN. Okay, really life hasn't been all that dramatic. The problem is my kiddos and I missed quite a bit of school this winter, so I really did not have too many new things to share. Some weeks my classes (I have 2 on alternating days) would only get one day of school a week. Therefore I reused many things until they got the concept being taught.
 Enough gloom and doom for now. Spring is here, and brand new things are in bloom! Here is a look at some spring time events going on in March. As of now they have a St. Patrick's Day focus. One fun tradition at our school is hunting for the leprechaun.  The week before the 17th, my director will play tricks on the kids while they are at recess. (i.e. steal our gold, mess the room up, leave foot prints, etc). The kids love it! They enjoyed hiding our gold and searching for it if it went missing. They walk through the hallways so quietly trying to find the sneaky little guy. What fun!

St. Paddy's Day also provides many learning opportunities. Lucky Charms has been a big deal of late. In fact we made Lucky Charm treats the other day to practice our measuring skills. They were a tasty treat! The kids also love playing with the cereal in the sand & water table. I always tell my kids that the food in our learning centers is full of yucky germs, so they do a great job of not eating the food set aside for play.

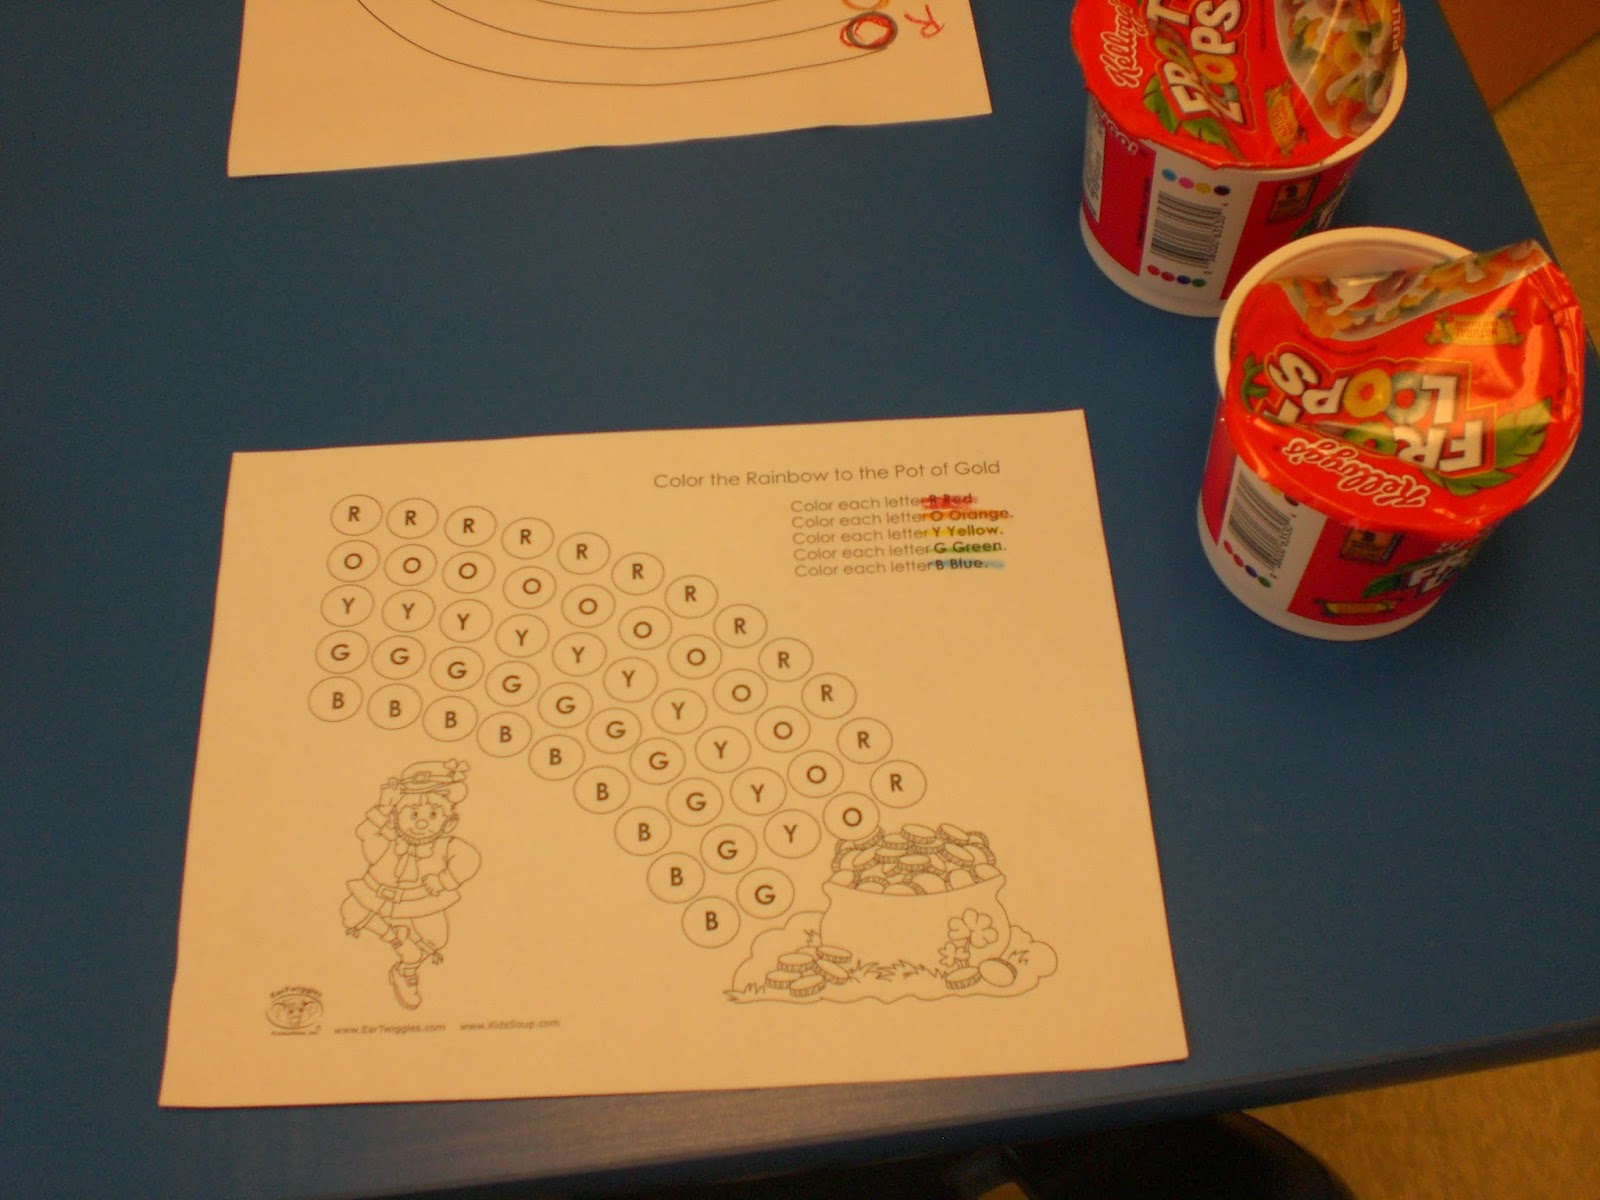
I used St. Patrick's Day as an opportunity to teach about the rainbow. As a literacy activity, I used Fruit Loops and a rainbow letter map to have the children match up the correct color on the correct spot. The print outs I used came from KidsSoup.


I left a felt board on the science table and did my best to cut out rainbow shapes of each color. Based on the material I had left, it didn't turn out great. However, the kids enjoyed using it, so it served its purpose. You can also see where that tricky leprechaun visited us.


While looking around for ideas on Pinterest one day, I came across a Pot'O Gold activity.I didn't have the materials on hand to put together the learning center, so I improvised. I also made mine a math center instead of the letter O idea it had been intended. Instead of giving each pot of gold (a black paper cup from the dollar store) it's own individual rainbow, I constructed a rainbow from party streamers and tape. I used pink in place of orange since that is what I had. I searched and searched and searched for candy or play gold coins, but I finally settled on gold Dove chocolates and Butterfinger chocolate egg candies as my gold. I took clothespins numbered 1-20 that the children could clip onto the cup and place that much gold under the rainbow. The rainbow really helped attract the kids to the table. This was also the pot of gold we would hide each day.


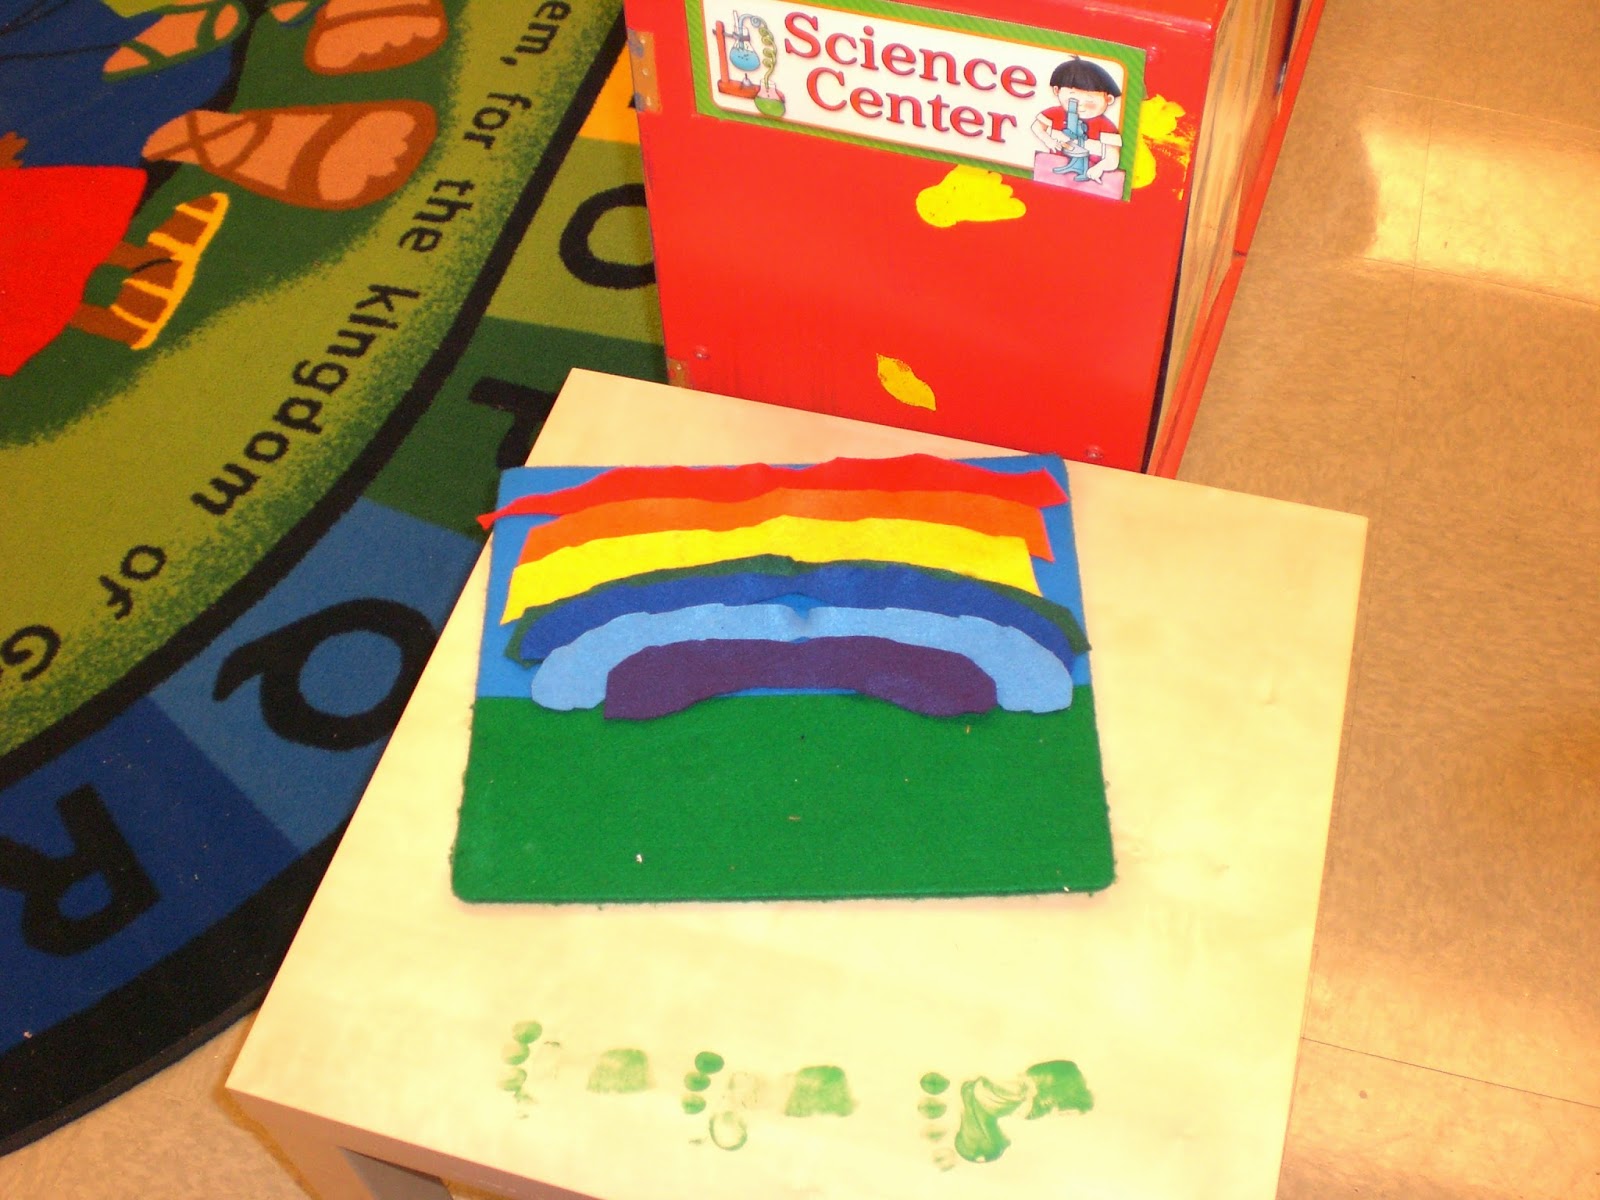
We reinforced our skills of rainbow colors with a craft for each class. Some projects did get out of order a little bit depending on how much space the children allowed as we worked, but they did know where it should go. ;-) Here is a leprechaun hat streamer rainbow and a paper plate collage.

Some other learning activities included graphing Lucky Charm marshmallows. You can find plenty of graphs online. I never did get a chance to let them color their findings, but the sorting and counting gave them plenty of practice. The classes also got a chance to practice writing their letters in leprechaun goo (hair gel and green food coloring in a plastic baggie). Be sure to tape your baggie on ALL 4 SIDES. I should have known better, but you live and learn. Thankfully it is fairly easy clean up if the worst should happen.


We also had some shamrock fun. I placed dots on the shamrocks and the children had to match a rainbow stick with the corresponding number to the correct shamrock. I also wrote the lowercase letters on one side and they matched it to the uppercase letter on our circle time carpet.


That's about it for now. Hopefully the snow is about gone, and I will have lots of new spring activities to share. We are also ready to get outdoors some more and have some fun!

Monday, February 3, 2014

Snow Much Fun!

I was determined to post much more over the month of January, but it is winter after all. I still feel like I am on Christmas break with the on and off snow days. I must say that despite the interruption to daily schedule, the snow has provided much fun. I began the month by introducing Arctic animals to the children such as penguins and polar bears. We practiced tracing, cutting, gluing and painting skills with some fun crafts found at KidsSoup.com. I love that site!
Potato Print Craft
The kids absorbed the information, but the most fun has come from our hands on snow experiences. Here is a look at the winter fun we experienced through out the past month!
        Back in December I discovered these adorable snowman cardboard buckets from the Dollar Bin at Target. I placed one at each seat at my math table along with different clippers and tweezers. I took my dice (available at the dollar store) and placed it in the middle with a bowl full of cotton balls. The children practiced one-to-one correspondence by feeding the corresponding amount of "snowballs" to the snowmen depending on what number they rolled on the dice. I will also add that I adapted the activity for my mom's kindergarten class. Instead of using the dice, I wrote the number words on homemade flashcards. Her kids were learning how the spell the numbers, so this fun activity provided fun practice for them.

 Another fun motor skills activity involving snowballs included some vocab practice. I came across this idea during a Pinterest search. I did not have white poms poms, but I did have different sizes in color. All you do is take 3 different sized containers with large, medium and small written on them. The kids use the tweezers to sort the correct sizes. My class loves these types of activities, and it aided in their vocab and sequencing abilities!

I also have begun working on the 10s family with kids. To introduce 11-20, I found this fun activity involving hot chocolate, and let me tell you that hot chocolate is being consumed in high quantities around here! Brrr, it's been chilly! Anyway, I cut out some mug cutout and glued them to white paper. I slipped them into page protectors and used dry erase markers to change the numbers. The kids found in challenging to pick up the marshmallows with the tweezers, but it was great pre-writing practice! We also practiced our graphing skills with a fun taste test you can find here.
I also updated our SWAT game to fit the season as well as our new alphabet letters we learned this month. My artistic ability is not the greatest, but hopefully you can tell what everything is. The teams for the month were the polar bears vs the penguins.
I also had a class practice tracing and cutting with mittens. My mother had given me a mitten for my bulletin board with this fun poem. Each child colored one mitten with the colors they chose, and the other we lined with cotton to keep our hands warm. It is a longer poem, but by the end of the month the kids knew it. All of them could do the hand motions we came up with as well.
Stripes or dots or sparkling white (jazz hands)
Mittens in winter fit just right (mime putting mittens on)
Wool or cotton, may leather (shrug shoulders)
Mittens warm us in cold weather (hug yourself)
In rainbow colors or darkest black (shield eyes)
Mittens fit in your pocket on in your pack (mime placing mittens in pocket & pack)
Thumbs alone, fingers together (shake each)
Mittens warm us in cold, cold weather (hug and warm yourself up!)
The rest of our snow fun included actually playing with snow from the comfort of our classroom. The first day I placed some snow in a bin on our new science table. The children built a snowman and snow castles. They had a lot of fun exploring with their hands. They liked using the spoons and other tools to keep their hands from freezing.

Even with a mat under the table, the activity was still a bit messy. The next day I put the snow right in our sand and water table. Originally I was using white rice and thinking about switching to Epsom salts, but the kids had so much fun with the real thing (and we have plenty of it!) that I decided to keep it there. They made lots of cool things with our buckets, measuring tools, water wheel and cups.
I've been finding that my class gets bored quickly with the same old same old. I ended up finding neat ideas to keep the snow exciting for the kids. We began with spray bottles full of water and food coloring, and I added water colors and paint brushes to color the snow. My director also found bottled water colors that I watered down and put in cups and watering cans. The kids used paint brushes in the cups and poured the watering cans into the snow. They loved seeing the rainbow colors in the snow. It also provided a nice introduction to mixing primary colors to make secondary colors.
We also had fun experimenting with melting snow. I placed some snow in a muffin tin and sprinkled hot water, cold water, sugar, salt, Creole spice and left one plain to see what melted the quickest. The kids also helped make snowballs that we placed on a magazine, plastic bag, plastic lid, metal pan, felt and a cardboard lid to see what melted the quickest. We also peeked outside to check out the foot prints in the yard. It looks as if the Easter Bunny has been scoping things out to get ready for our Easter Egg Hunt in the spring! Snow may keep us from school some days, but it sure does provide several fun teachable moments!

Thursday, January 2, 2014

Christmas Happenings

December flew by in a flurry of excitement. Between snow days and preparation for our Christmas program, I didn't accomplish as much in the classroom as I would have liked, but we did the best with the time we were given. Here are some highlights of Christmas fun!
   I revisited the popcorn activity we did earlier with numbered cupcake liners. Instead of using popcorn, I placed M&M's in a bowl, and the children were able to count out the correct number.


 After the children got bored of this counting activity, I used the M&M's for a fine motor activity. The candy remained in the bowl, and I placed different clippers and recycled water bottles on the table. The kids had a blast trying to get the M&M's into the bottle. This could prove to be an exciting sorting activity as well.
*As suggested by my director, I always tell the children that the candy contains nasty germs, and they will get sick if they eat the candy we are playing with. They all do a good job of following these rules. At times we have a chance to eat the good candy, but the learning center candy is used for learning!


I found some Christmas tin buckets in the dollar section at Target. I set four of them up and placed a bowl of various Hershey kisses and hugs for the kids to sort. After they were through with that activity I used the buckets and cookie sheets at my literacy table. I placed some hot cocoa mix on each sheet and placed a candy cane in each bucket. The children used the candy canes to practice writing their names and draw in the powder. This seemed to be the most favored activity during December. It was messy, but the joy in their faces was worth it!


Another math activity was patterning. I laminated white candy canes cut from paper and placed out some dry erase markers. I also laid out candy canes for ideas. The children would then replicate the candy cane patterns over and over again on the laminated canes.

We also took some time studying the true meaning of Christmas through the telling of Baby Jesus. One way to bring the story to life was these fun felt characters I cut out for the felt board.
 Through teaching Sunday School, I came across this sheep craft that I would have used in the classroom. I did it with the junior aged kids at church as well as my 2&3 year old Sunday School class. I found the ornaments on Pinterest. All you need is a cut out of the child's hand, cotton balls, glue, googly eyes, a hole puncher and yarn.


Another big hit in the classroom was my gift wrap station. I found Disney themed Christmas paper at the Dollar Tree along with bows. I also provided tape and ribbon along with small boxes I found around the house (old cell phone boxes, small packages, tissue boxes, cereal boxes, etc). I was really surprised with how well the children did. They also had a chance to trim our tree each day, and the Christmas countdown was a big hit too. At first I would carefully unwrap the gifts, so the supplies could be reused. Once they began to tire of the activity,  left them wrapped and under the tree for a festive look to our room.


The children enjoyed receiving Santa mail from the stocking hanging on our door. It served as motivation in preparing for our Christmas program in which they did a terrific job! The kids also used cookie cutters to make ornaments from clay. They loved painting the ornaments and taking them home. We had plenty of other fun, and it all went un-photographed in our busyness. Nevertheless, I enjoyed the holidays, and now it is time to learn about winter!

Thursday, October 24, 2013

Pumpkin Fun

Fall is hands down my favorite season. I love everything about fall, the smell, the colors, the fashion, the weather, etc, etc. Fall feels like holiday kick-off to me. One thing I spotted this year that let me know fall had arrived was the pumpkin. I pass about 3 pumpkin stands on my commute to work. These stands started popping up in September, so I began my itch for October. I love pumpkins, so pumpkin week is one of my favorite themes to teach in Pre-K. We had a lot of fun this year with it!
      The best thing we do it simply cutting open the pumpkin. I cut the top off beforehand, and the children reach in and pull out the "guts." They love it! A few were a bit shy about getting messy, but most of them asked for a second turn. When we came back inside, the kiddos made their own pumpkins. They got an orange double sided (folded) pumpkin with a stem. I used a stencil found online. I placed glue, pumpkin seeds and yellow yarn in front of them. The outside of their pumpkin read, "What's Inside?" This is based off a craft I found on Pinterest.
Final Products

The inside look

Close-Up

Much like the apple math center from No Time for Flashcards, I did a pumpkin seed count. The only variation I came up with was exchanging the tally mark cards for numbers. I recycled my magnetic numbers from the squirrel and nut count which worked great with the cookie sheets. The child chose a number card, attached it to the side, and placed the correct amount of pumpkin seeds on the pumpkin.
The center set up

Ready to go!

A fun idea I got from KidsSoup was pumpkin pie topping. My grandmother had given me tiny pie pans for cooking while I was student teaching. I never got to use them until now. All I did was cut out some brown circles, place them at the bottom and set out cotton balls. The children grabbed chip clips, clothespins, or tweezers and placed the topping (cotton balls) on the pie. This could easily be made into a counting activity as well. I chose to use it as a pre-writing activity for developing that pincer grasp.
Simple fun
Finally I found a pumpkin play dough recipe I really liked. The play dough smelled wonderful, and it was the perfect consistency for play. The recipe also explained how to dye noodles. I placed the green "stems," play dough, green pipe cleaner and a bag of fake flowers out on the table. I instructed the children to make a pumpkin patch after learning about the life cycle of a pumpkin. Knowing about vines, stems, yellow flowers and pumpkins, the children made a beautiful patch. I was really proud of their creations! The below is an example I put together for photo sake.

Of course to complete our study of pumpkins as well as apples from September, a field trip was in order. The children enjoyed picking their own apples from the orchard and taking home a pumpkin from the patch. The hay ride was a big hit too!. Fun times! I love October!
Apples Galore

A successful pumpkin picking

Hayride fun!


Thursday, September 26, 2013

Apple Theme Fun

Fall is a wonderful time of year! I love the weather this time of year and the beautiful colors. As a teacher, I love it even more for the many, many themes fall offers. This year to kick off the start of a new school year, we chose an apple theme for September. Here are just a few ideas I came across over the past couple weeks:

My personal favorite was teaching the children the parts of the apple. I wanted to do more than just a poster printed off the computer. When researching teaching ideas, I saw an adorable "Parts of the Apple" display on a Google images search using a pocket chart. It was then I remembered my brother had fixed my flannel graph board. This inspired me to use felt to teach the parts of the apple. As suggested by my director, I printed off labels and used Velcro so they would stick. The children had so much fun helping me stick up the pieces and labels each day. They picked up the scientific names very quickly!

I used a worksheet from KidSoup to reinforce the apple parts. I could not find one with the names already on the paper, so I just made my own dotted words for the children to trace. Not only were they practicing the parts of the apple, but we were honing in on those writing skills.


We went right from parts of the apple to the life cycle of an apple tree. Many may be familiar with the finger play "Eat an apple, save the core, plant the seeds and grow some more." Thanks to Pinterest, one of my classes made these. I had extra black beans left over that the children glued, and I reinforced with packing tape.

The reason I had so many black beans on hand was thanks to an idea I was led to on No Time for Flashcards' facebook page. The idea led to some great one-to-one correspondence as well as pre-writing skills with that pincer grasp. The cookie sheets came from Wal-Mart, a 97 cent find!


Another Pinterest inspired idea was an apple taste test. The first letter I introduced my students to was the letter M, so I called it the Apple Mmm Test. I provided each child a plate with an applesauce MUFFIN(that they helped me MIX & MEASURE the class day before), apple jelly & apple cinnamon cheerios with a cup of apple juice. I provided each child with a stack of pre-cut colored apples. They followed my instructions about what to eat. As they tasted the food they brought the proper color to put on the graph if they liked the treat. After everything was finished, we compared the results.

I decided to celebrate Johnny Appleseed Day with the class as a bit of a special event. I wanted to go outside and play a group game for something different. When I looked up ideas online, I was not finding anything fitted with what I wanted to accomplish. Finally I settled on planning my own relay. I took 2 pans from the children's play kitchen set and got 2 fake apples. The children were instructed to place a hand behind their back, and hold the pan with the apple in it in the other. We reviewed how Johnny Appleseed wore a pot on his head and planted apple trees. It took a while for them to figure out how a relay race works, but they had a lot of fun trying.

Another idea I found one a random web search was using paper bags as your basket which turned into a fun letter sorting activity for the children:

I also enjoyed this idea from Teach Preschool. The kids really loved scrunching up their paper for their paint brush. I wanted to see how their imaginations worked, so some of these trees looked quite interesting. Some of the children really did a good idea of dabbing their ball into the paint and stamping it onto the paper, and some of the children rubbed their paint ball all over the place. I enjoyed seeing all of their trees.


To leave off, I haven't needed my whiteboard for anything yet, so here's what I came up with to keep the room looking exciting:

Another big hit was making these little guys. The sad thing was when it came time to eat the pie, many of the kids said they did not like pie. However, they had so much fun mixing the ingredients together and helping with the measurements. I also now have an awesome recipe for Thanksgiving!

That's what I have to share about my first Apple Theme. Looking forward to many fall fun themes in the weeks to come!